How to configure the External tax engine for Avalara
About this article
In Centra we have added an 'External tax engine' plugin that you can set up as an integration for applying tax from an external source. This can be used as an alternative to Centra’s internal tax engine, called Tax groups. We have chosen to integrate towards one specific tax engine, Avalara. In this article we will go through this specific setup.
You can also integrate towards other external tax engines, for example Vertex or TaxJar. The developer documentation, where you can learn more about how to build the integration toward the external tax engine plugin, follow this developer documentation.
Please note that Avalara is a company offering different solutions like consulting, reporting, other services and different products, such as Avatax.
A little bit of background
The Avalara integration can be used for any country except Brazil. It’s best used when you do not want to set up a lot of separate tax rules manually, but instead want to simply get the tax values directly in your checkout.
There is no need to manually set up tax rules for countries that will be used in the Avalara plugin. However, you can mix and match the Avalara integration with Centra’s internal tax engine. This means that you can set up Avalara just for some countries that have a complex tax setup (e.g. US), while using Centra’s internal tax engine for the remaining countries.
Avalara’s tax values and according tax rates will be saved on orders, shipments, returns and used in all other post-purchase places (e.g. Reports, Dashboard). However, be aware that those tax rates will not be found under the Tax rules list in Centra.
Keep in mind that the checkout process is expected to be slower with the external tax engine, since additional requests are made. In case of errors, Centra’s internal tax engine will always be the fallback. Therefore, we recommend having default tax rules set up in Tax groups in Centra. In other words, as long as the Avalara external tax engine is used for a specific country, even if a Tax group (Centra’s internal tax engine) is also created for that country, the Avalara option will then override the Tax groups.
Centra calls and receives updated tax value from Avalara on each transaction change action required, and on Shipment complete Centra sends final order data to Avalara, and with that transaction is registered. Centra still records the tax percentage from Avalara, but it is not calculated within Centra as previously, Centra operates on tax values only. If you are using the Centra Avalara solution to calculate tax values and submit orders to Avalara, then you are able to use Avalara for reporting purposes as well
How to configure the External tax engine plugin for Avalara
-
Go to 'System' > 'Stores' > Click on the store to open it
-
Scroll down to Plugins and click '+Add plugin method'
-
Select the Plugin called 'External Tax Engine', and the following fields appear:
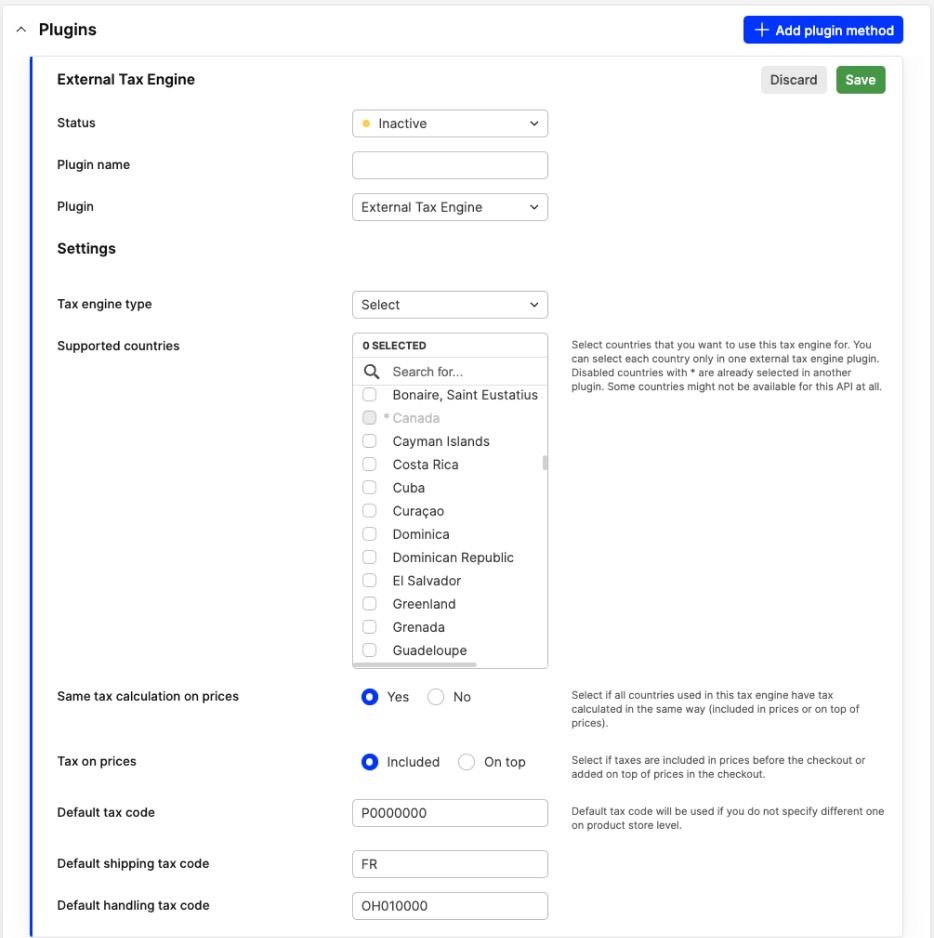
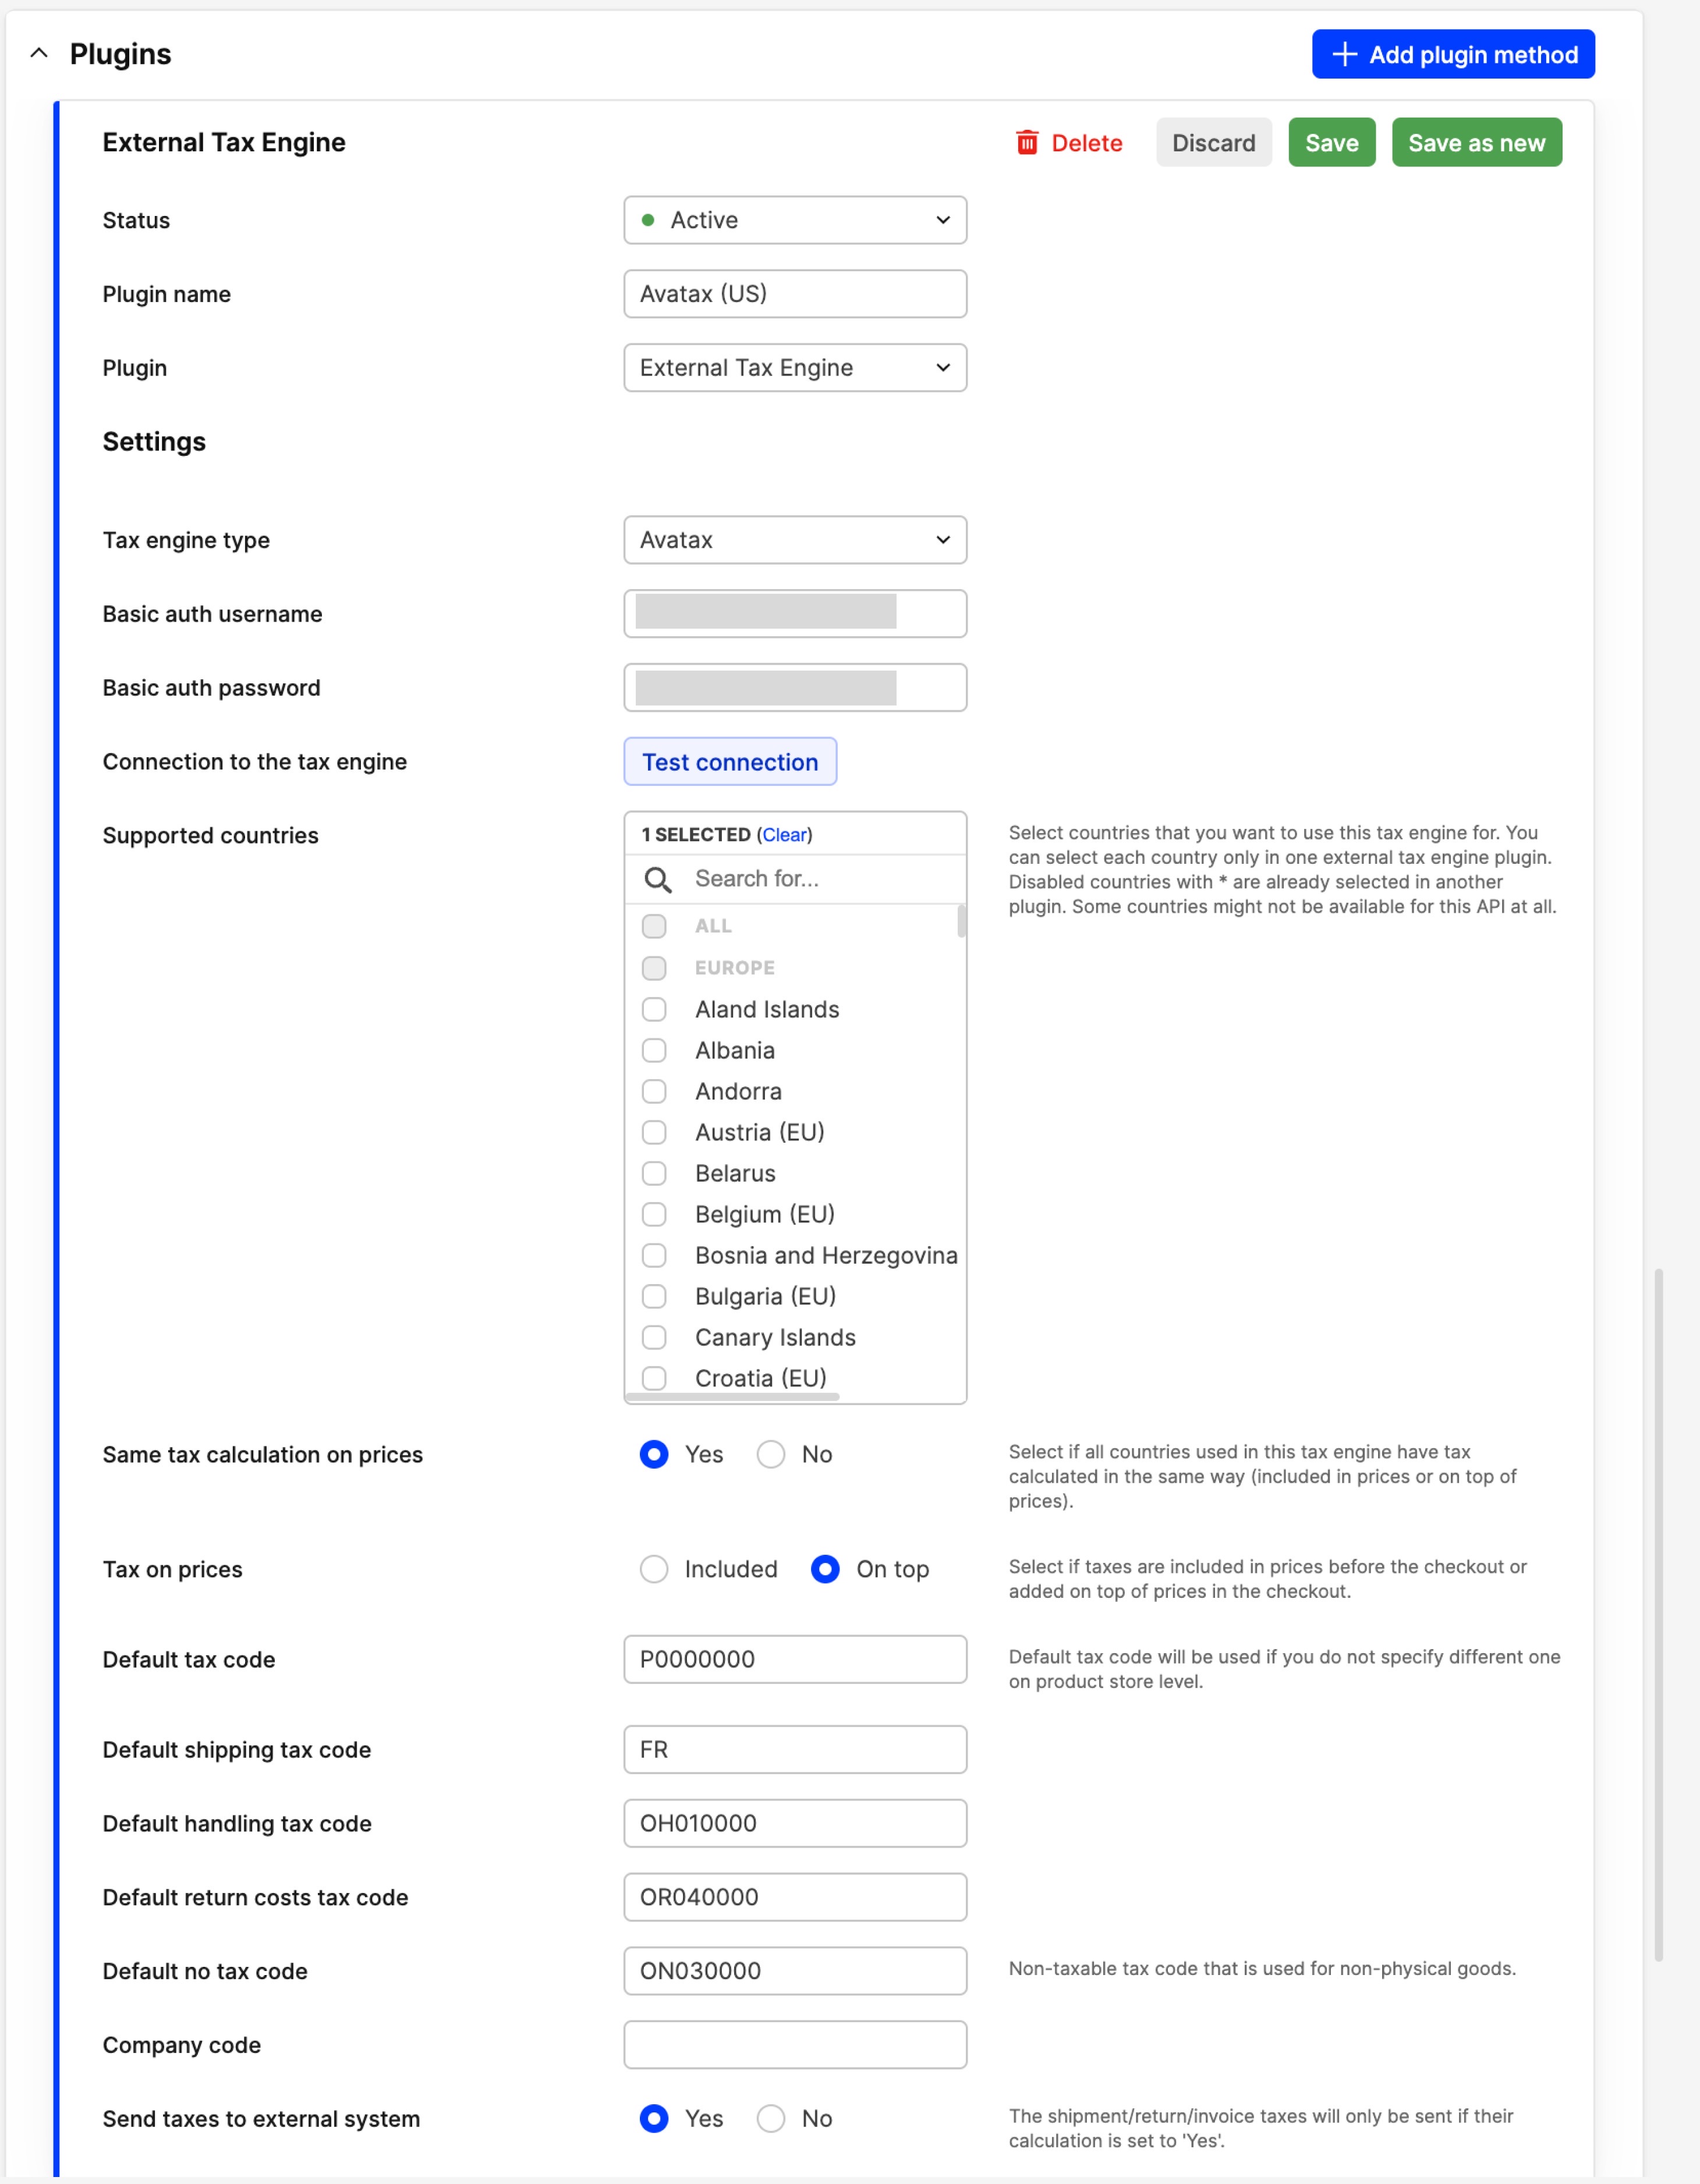
- Status - Activate your plugin when you are done with the setup and want to start using it
- Plugin name - Name your plugin. The name should be unique
- Tax engine type - You will see Avatax as an out-of-the-box integration in the list. Please select that one. If you integrate toward other tax calculating integrations you will have other options in the drop-down list. Once the partner integrates, the option appears
- Basic auth username - This is the username coming from the API setup in your integration. You need to have a licensed version from Avatax to be able to use their integration. This is the ‘Account ID’ found in Avalara once you click on Account on top right. Read Avalara’s documentation for more information
- Basic auth password - This is the password coming from the API setup in your integration. This is the ‘License Key’ in Avalara. You can find it by clicking Settings > License and API keys > click ‘Generate new key’ under the License key tab. Read Avalara’s documentation for more information
- Supported countries - This is the field where you decide which countries the external tax calculation should be applied to
- Default return costs tax code - This is the default tax code that applies tax on the return cost. It can differ per product, so you can also override it on the product level
- Default “no tax” tax code - non-taxable tax code that is used for non-physical goods, for example compensation on return
- Send tax to external system - Decide if you want to send transaction data to Avalara or not. If you will set it to “No” you are able to use that plugin only for calculation purposes, but you can’t have transaction data, i.e. reports inside Avalara. You are able to use Centra’s reporting system for that purpose. If you set it to “Yes”, then you can calculate and record transaction data inside Avalara.
Please note:
- For example, if you want to use Avatax only for the US, because of the complexity of the tax system, but for the EU or Sweden you want to use Centra’s internal tax engine - you should select US only in that plugin, and set up proper tax rules for the rest of the countries that should be affected by Centra’s internal tax engine
- You can select an external tax engine for all countries; then it will calculate tax accordingly based on the third-party tax rate. However, in this case, countries should be separated by the type of tax that should be applied, for example: Added tax, e.g. Sales tax in US or included tax in the price list, e.g. VAT in EU. This can be achieved by further settings, or you can simply separate them by plugins
- The plugin should have unique countries that are used in it. Countries already used in different plugins for this store are disabled (grayed out, not selectable) with an asterisk (
*) see screenshot above -
Some countries might not be supported. These are disabled, and the following description appears: "Not available for this API". Brazil has a totally different tax system, so it is not possible to set it in the current version of Avatax integration
- Same tax calculation on prices - This field decides if the countries selected above have the same tax system. For example, if tax should be included in the price list before checkout (e.g. in Sweden) or added on top of the prices in the checkout (e.g. like in the US). By default the 'Same tax calculation on prices' setting is set to 'Yes'. If you change it to 'No', a new multi-selector appears:
- Countries with tax included in prices - Here you select countries that have tax included in prices. Not selected countries will have tax calculated on top of price in the checkout. It is a dynamic field and displays only the countries selected in the Supported countries

- Countries with tax included in prices - Here you select countries that have tax included in prices. Not selected countries will have tax calculated on top of price in the checkout. It is a dynamic field and displays only the countries selected in the Supported countries
- Tax on prices - Select if taxes are included in prices before the checkout or added on top of prices in the checkout
- Default tax code - Add a default tax code in the plugin that will be used across your products. This applies to all products, except those that have a tax code selected in the store-specific attributes. This is covered in more detail in the Tax code on the Product section below
- Default shipping tax code - This is a specific tax code that tells Centra which tax code should be applied on shipping cost. This is filled out automatically with the default Avalara value when the new plugin is saved. Here you can read more about the tax codes. Note that this field is still editable, so make sure that the right tax code from the integration is the one being used
- Default handling tax code - Similar to above, but for handling cost
Warehouse setup (mostly used for US setup)
Go to 'System' > 'Warehouses' and open a warehouse. You can specify where the warehouse is located by adding "Country and state", "Zip code", "Street" and "City". This is needed if you plan to use an External tax engine.
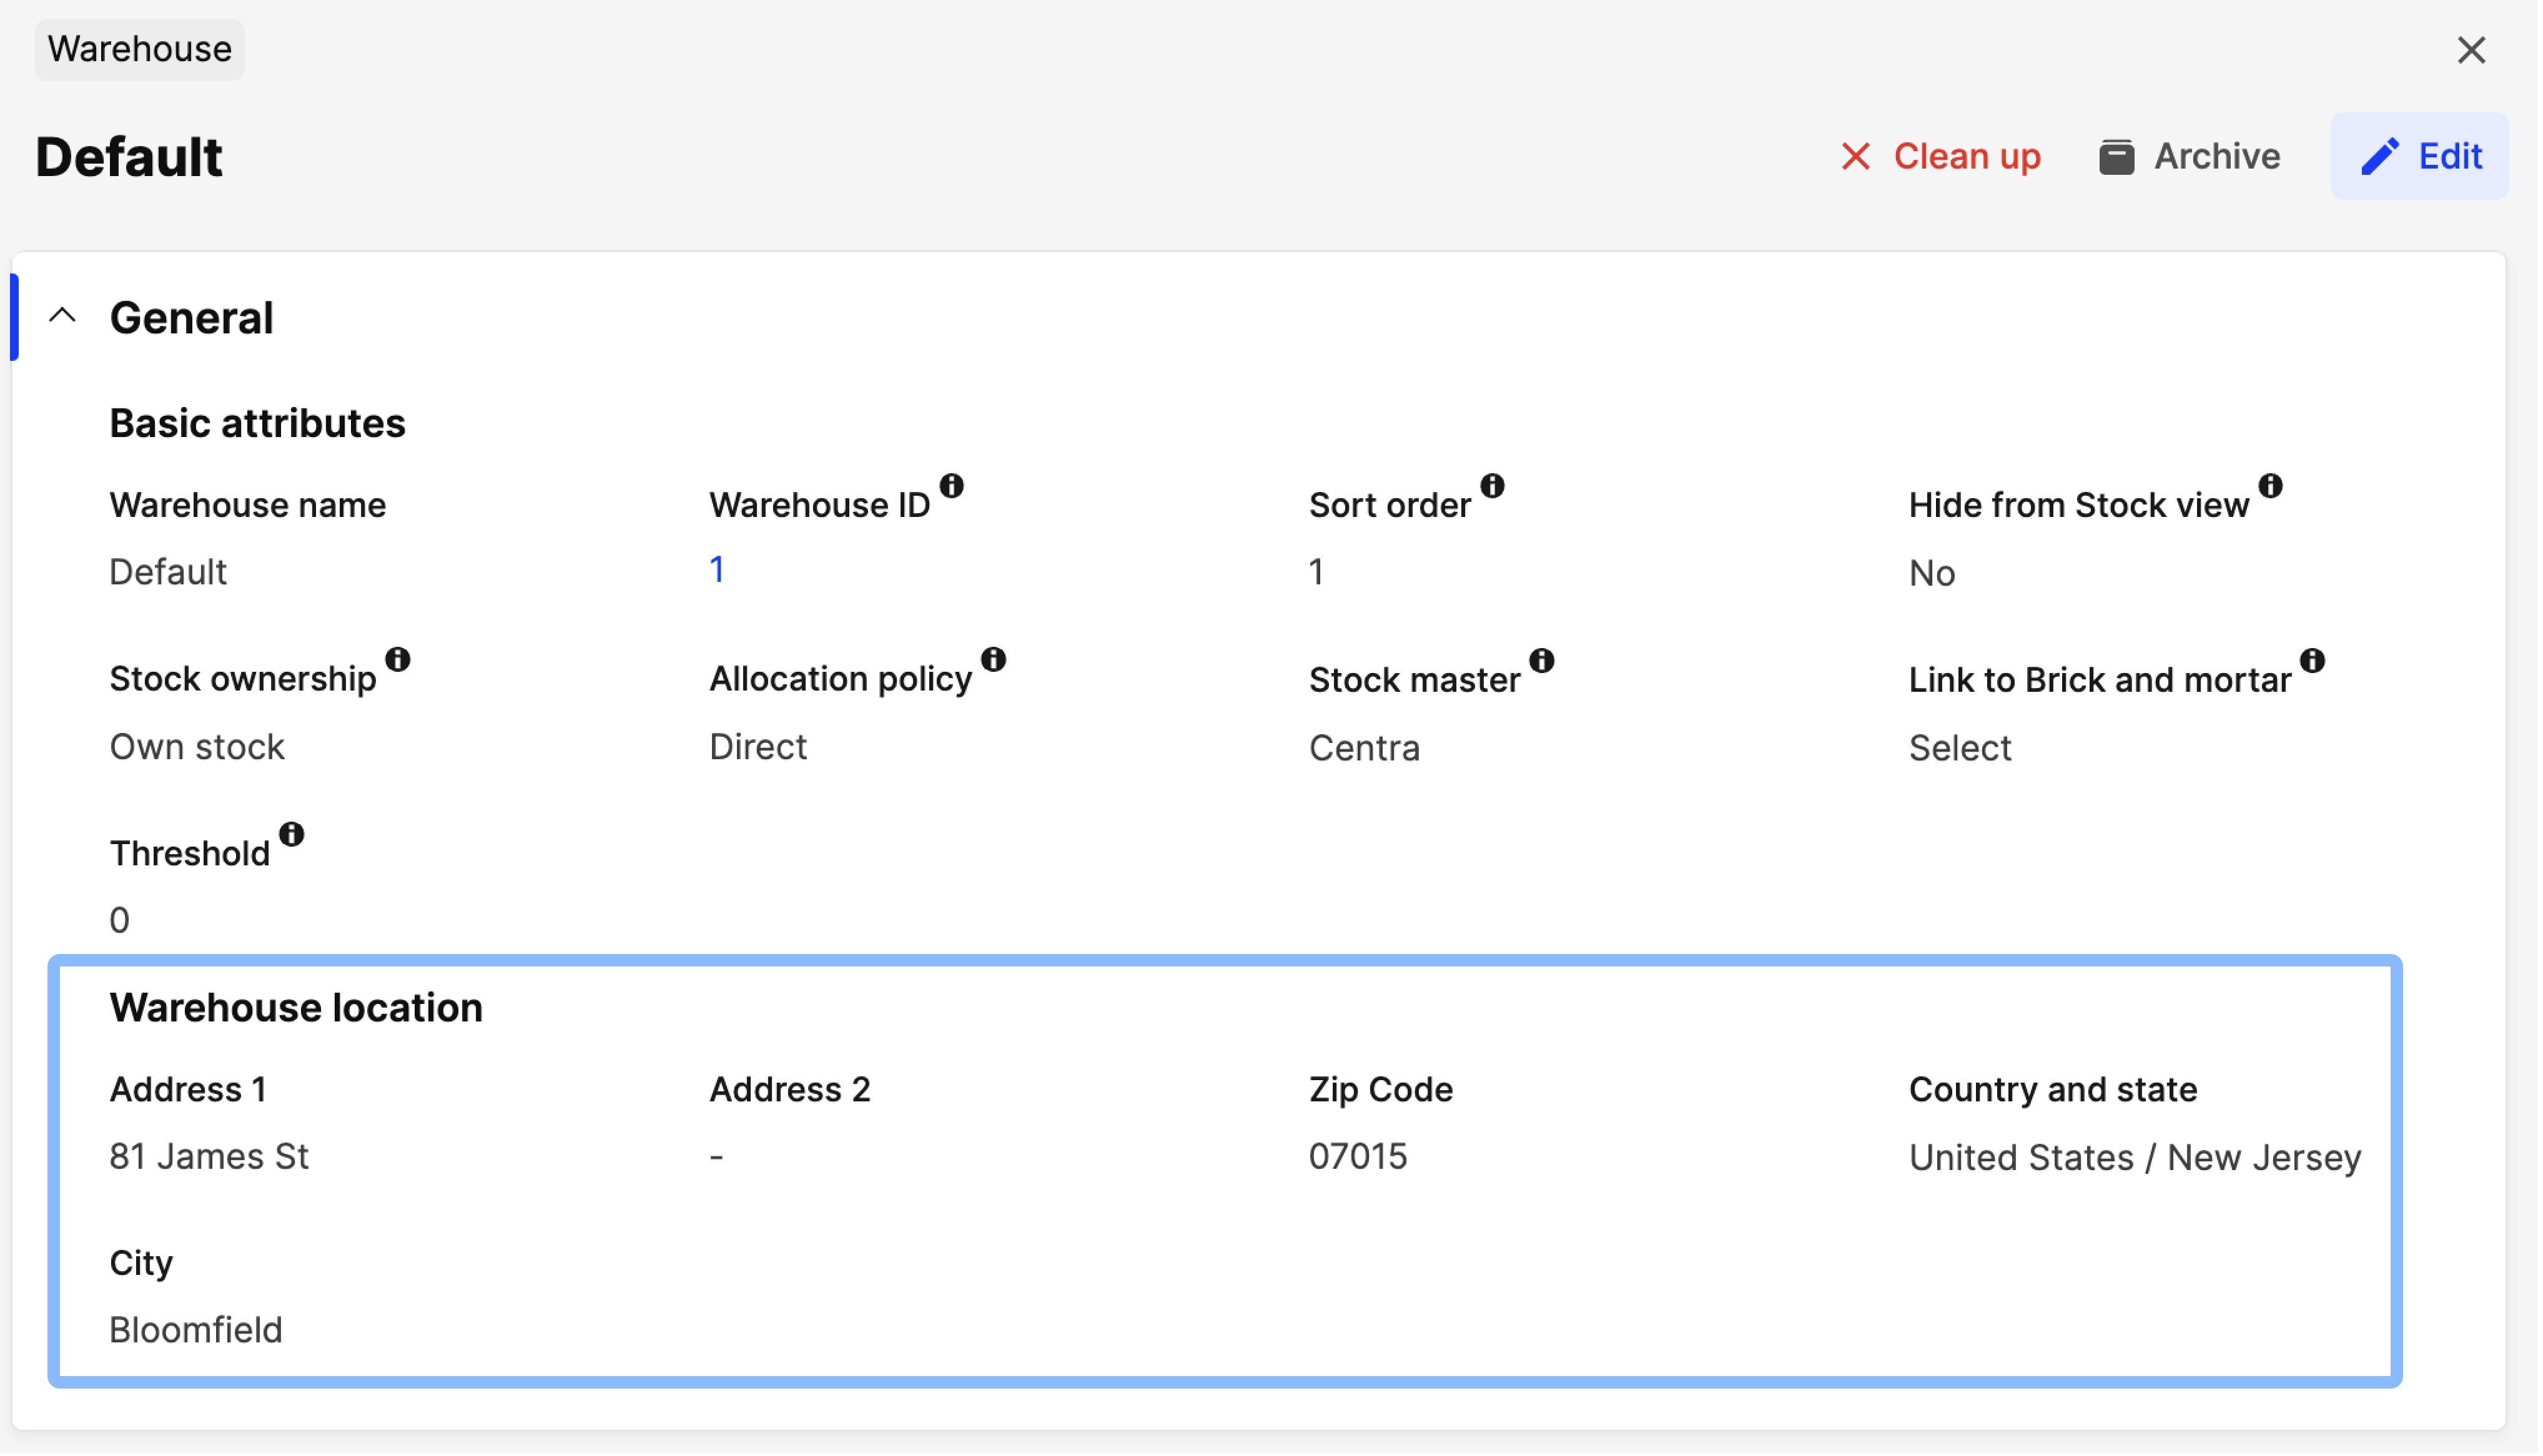
It is not possible to save a Warehouse without Country and Zip code if there is an 'External tax engine' plugin created. Also, it won’t be possible to activate the plugin for 'External tax engine' if you haven’t added Country and Zip Code in your Warehouses.
This is required because the External tax engine should know the exact warehouse location, since the tax rate might differ depending on the location. For example, it is important for US locations, where the shipFrom address determines the tax value, not only shipTo address.
For countries where 'Added tax type' is used, the following is important to remember: an estimated tax is applied during the checkout, but the final tax rate depends on which warehouse it will be sent from, so when allocation is performed - e.g. shipment is created - the tax will be updated.
Tax code on the product
For products with tax codes that vary (for example, between different states, as in the US), you must set these tax codes per product. The 'Default tax code' set up in the plugin will not be enough. For example, jeans in NY can have 5% tax, but all other apparel will be 10% in NY. This means that the tax can be different per state, depending on the tax code.
Below we explain how to do it on product level, or in bulk for multiple products:
Change on product level
Find the Tax code field on your products:
- Go to 'Products'
- Select a specific product and scroll down to 'Store attributes'
-
Here you will find the Tax code field per External tax engine plugin
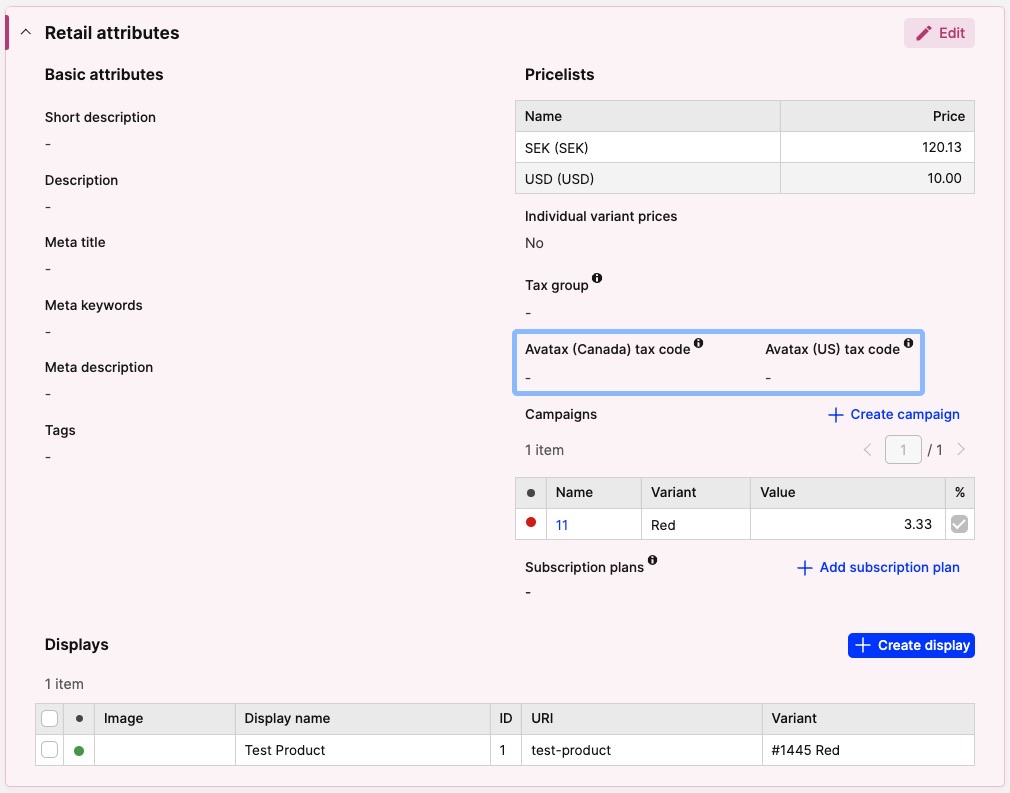
You can specify tax codes only for 'Active' External tax engine plugins. If you have more than one plugin, you see multiple fields in this section.
This is a free text field that is saved and sent to Avatax during the order creation.
Change in bulk
-
Go to 'Products'
-
Select the products in the list that you want to change Tax code for by ticking the respective checkbox
-
Select 'Update tax codes' in the batch action drop-down and click 'Apply'
-
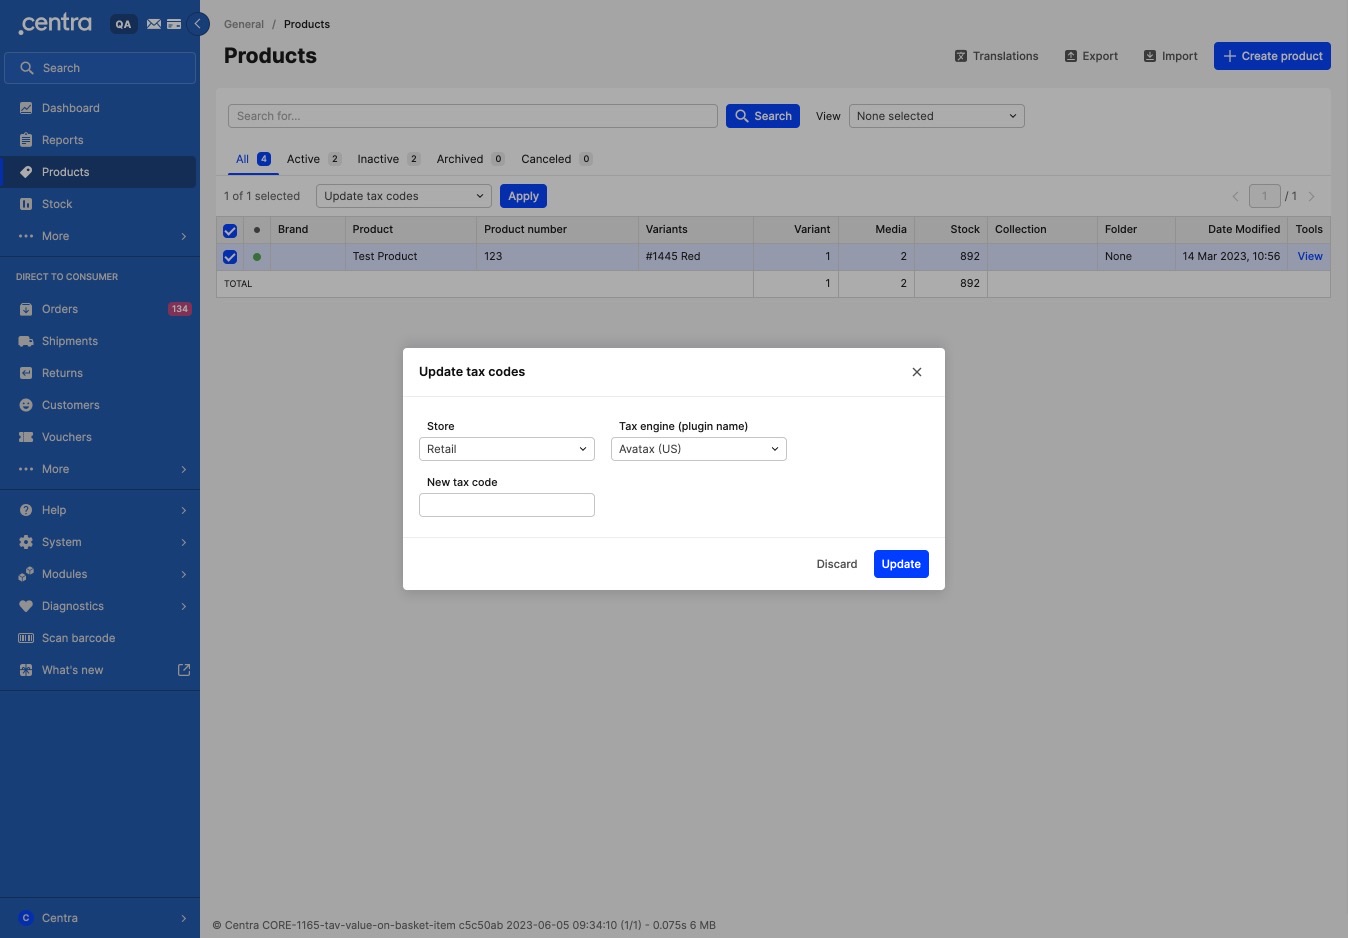
The following pop-up appears:
-
Select the following:
- Store - Select the store you wish to update this for
- Tax engine (plugin name) - Select the External tax engine plugin that you want to use for the selected products. All active External tax engine plugins created for the selected store will appear in the drop-down list
- New tax code - This is a tax code you can get from the integration. For example, when using Avalara you can find the list here - https://taxcode.avatax.avalara.com/
-
Click 'Update' to save.
You can still have a default value specified in the plugin.
Customer exemption code assignment
You have the option to assign a custom exemption code for customers in DTC and for accounts in Wholesale, providing a more precise tax exemption experience for different customer groups. The exemption code entered will be included in the payload, allowing the external tax service to verify eligibility for the exemption and apply it as needed.
In both modules (DTC, Wholesale), you will find a custom attribute for the Avatax tax exemption code associated with each External Engine plugin that has been added.
Customer View:

Account view:

Company code field
If your tax engine supports a multi-company setup, you can specify the company for tax calculation by using the company code field at the plugin level in Centra. This field allows you to input a string as a company identifier for your external tax engine. By providing this code, your tax engine can accurately assign taxes on behalf of the desired legal entity.

Post-order
Once an order is created and external tax is applied, you can see this information on the order in same way as you would see it today with default internal tax engine. The only difference is that more information can be found about the tax break down and where that tax is coming from. To achieve this, click on the highlighted tax value, where you can see tax per order line, not only as a sum.
Centra reports and other views work the same when Avalara is used or when there is a mix of Avalara and internal tax engine.
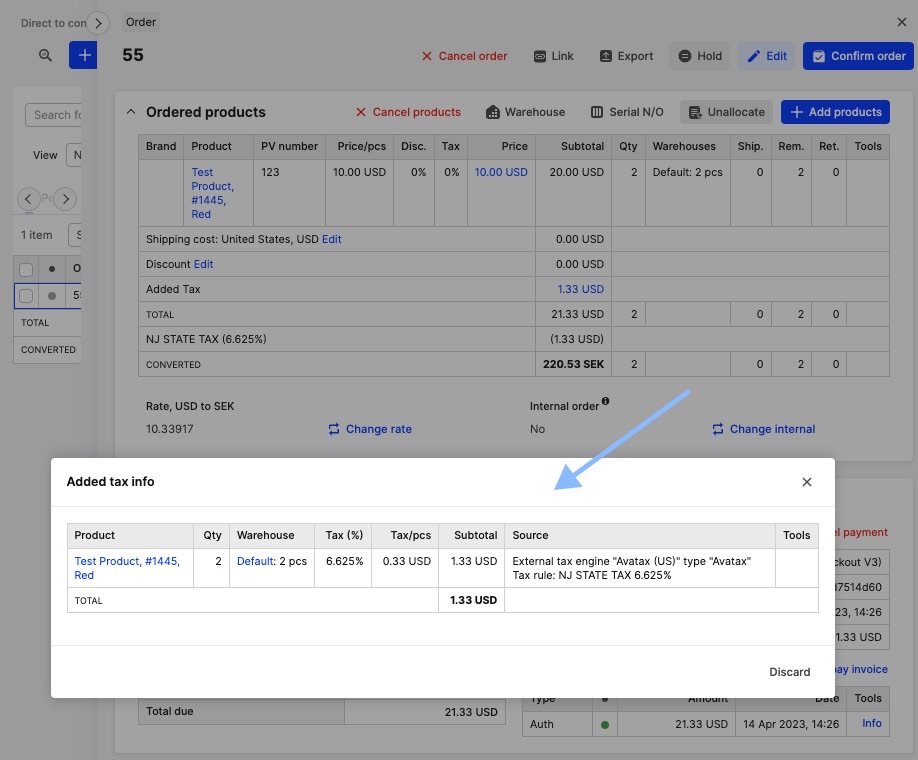
On each transaction modification on the order (i.e. changing the price, adding product, removing product etc.) Centra triggers an event to external tax engine (Avalara) and requests the updated tax value based on new data. The final tax is sent to Avalara when the event ‘Shipment complete’ is triggered. This data is used as final order data in Avalara and for reports. When a return is made, the transaction information is also sent to Avalara to make corrections on the balance accordingly.
Centra to Avalara calls:
Centra is making at least four calls to Avalara on each transaction:
- on pre-checkout
- on checkout
- on shipment creation
- on shipment completion
Depending of what occurs on the selection or post-order, Centra performs more calls to Avalara. Some examples are listed below:
- if a voucher is added in the checkout or on the order in Centra backend
- if a product is added or removed from the checkout or from the order in Centra backend
- if a return is created and/or completed.
Taxes on vouchers, credit vouchers and shipping
Vouchers and shipping are sent to Avalara as a separate item, and handled similarly in Centra. However, credit vouchers are considered to be a payment method, since you apply them on top of the order and after tax.
Credit vouchers as gift cards are purchased tax free, so when they are used, tax should be paid. It is not the voucher that is taxed, but the order itself. The end customer does not pay tax if the credit voucher covers the whole order. It should be the merchant in that case that covers the tax amount.
The amount due, and tax calculated, should be fully reported and remitted. This should happen no matter how the end customer pays for the transaction, even if a credit voucher is used. Avalara does not need to know about the payment method used (i.e. credit voucher), but what was paid: both total amount and tax.
Let’s review how this looks in practise, using an example order that is fully paid by credit voucher:
- the end customer receives the order confirmation with order value and what was paid
- authorisation and capture are made for order total
- once the shipment is complete, Centra submits the order to Avalara and when the transaction is registered in Avalara, the remaining amount for tax in Avalara can be seen. This amount should be remitted by the merchant in that case.
If you do not want to cover tax for the merchants you should instead use the ‘Voucher’ type, instead of ‘Credit’ for your discounts in the US. Learn more about this setting here.