Configure Klarna Checkout
How to enable Klarna Checkout V3 in Centra
We strongly recomend that you test the following steps and setup on QA before you do them on Production. And if you never have had KCO before and are building a new frontend checkout, keep in mind that Klarna wants to test the purchase flow on Demo before activating your live credentials. This can take up to 72 hours for them to do, so be aware of that when you plan your Go-Live!
-
Go to 'System' > 'Stores' in the main menu to the left in Centra
-
Click on your 'Retail' store
-
Scroll down to plugins and create a new plugin by clicking '+ Add plugin method'
-
Choose the plugin called 'Klarna Checkout V3' in the plugin drop-down list
-
Fill in the fields in the plugin as seen below:
- Plugin name - Here you enter an internal name for your new plugin. For example: “Klarna Checkout v3”
- URI - Enter a URI, if nothing is entered Centra will populate one from the Plugin name
- Name in frontend - Enter what your new plugin will be named in the Frontend
- E-Store ID - Enter your new EID that you get from your Klarna Merchant Portal
- Secret - Enter the API key that you get from your Klarna Merchant Portal
- Test-Mode - This option should be set to NO if you plan to go live in production with your new plugin
- Require success validation - When the validation callback on age restrict and/or stock, takes too long to respond. What should Klarna do with the order? YES - means that the customer is sent back to the checkout with an error from Klarna. NO - means that the order will go through anyway. This option is usually set to NO
- Klarna Endpoint - Here you select which Klarna endpoint that you want to use – either EU PROD or NA PROD, which is North America. If you’re based in the EU you should select the EU PROD which will allow you to still be able to sell to the US. If you’re based in the North America you choose NA PROD here instead
- Default Locale - Select which default locale you want in your KCO
- Test plugin against Klarna - Here you can click the orange button to test your credentials against Klarna when you are finished with the setup of the plugin
- Auto-register customers to newsletter - Choose Yes or No depending on preference. ‘YES’ means the consent box on the payment page is hidden, and customers are automatically registered for the newsletter. ‘NO’ means the consent box appears on the payment page. When customers check it, Centra registers them for the newsletter.
- Allowed Checkout type - (B2B needs to be enabled for your merchant account to allow organizations.) Here you can choose either Person, Organization or Person and Organization
- Allow separate shipping addresses in Klarna Checkout - Choose Yes or No
- Allow separate shipping address coming from another source - Choose Yes or No
- Show PayPal payment option inside KCO - If you’re using PayPal in your Checkout you can select to show it as an option inside Klarna Checkout and not next to it
- External Payment method - Here you select the PayPal plugin that you would like to show inside KCO
- Disable PayPal as a separate payment method when PayPal is available in KCO - Choose Yes or No
- Terms & Conditions-URL - Here you paste the URL to where the customer can find your terms and conditions on the site
- Enable age restrict - Choose Yes or No here if you sell stuff that minors are not allowed to buy
- Redirect for underage buyers - Here you paste the link to the page where you would like to redirect underage buyers
- Settings for styling where you enter which color code you want for the following parts:
- Color button
- Color button text
- Color checkbox
- Color checkbox checkmark
- Color header
- Color link
- Send product images to Klarna - Select YES if you would like to send the product image to Klarna
- Product image size - Select the size of the image that is sent
- Send product URLs to Klarna - You can send the product URL per item to Klarna through the API, or use the Frontend prefix below to specify the domain of the frontend, which will automatically be combined with the category that the product is in
- Send product sizes to Klarna - You can send the product size to Klarna through the API
- Invalid stock redirect URL - Here you add the URL where you want your customer to be sent if there is no stock left when stock validation is done in KCO – instead of ending up on Klarnas payment failed-page
- Frontend prefix for product URLs - Fill out if you want to define the Frontend Prefix that your images should have when they are sent to Klarna
- Restrict - You can restrict which customer should see this payment option by selecting them here - Pricelist, Market, Country and/or Locale. If none are selected it will be available everywhere
- Payment method cost - Here you can add a Payment method cost to the order if the customer selects this payment option in the checkout
-
Change the status to Active whenever you feel ready to do the switch. Please make sure that the Klarna checkout v2 plugin is inactivated when doing so
-
Last step – click 'Save'.
Final steps – check the integration
- Does Klarna Checkout load when you proceed to checkout in your store?
- Is your terms and conditions page linked correctly from the checkout?
- Do you get to a “thank you page” when completing an order? If not, make sure your frontend partner does as Klarna explains it in this link: https://developers.klarna.com/documentation/klarna-checkout/integration-guide/show-confirmation/
- Is a created order acknowledged? Double-check in the Orders app in the Merchant Portal!
- Do you have your store details and contact information visible in your store? This includes:
- Email address
- Phone number
- Company registration number
- For more detailed information or questions about your Centra and KCO integration, contact the Customer Success team at Centra.
How to set up Cross-sell in Centra using Klarna Checkout
The Cross-sell feature allows your customers to add extra products to the order in one click after checkout is completed. Note that this can be done without filling in the shipping address and payment details again.
How to set it up
To enable Klarna Cross-sell in Centra follow the steps below:
- Go to 'System' > 'Stores'
- Open your 'Retail' store
- Scroll down to plugins and open the 'Klarna Checkout V3' plugin
- Here you will be able to find the following two settings:
- Cross-sell – Set to 'Yes' if you wish to enable the functionality
- Cross-sell time limit (mins) – Decides the time in minutes before the Cross-sell offer expires in the checkout. Klarna is limited to a maximum of 20 minutes, the default is 3 minutes
 When the Cross-sell time limit runs out, Centra sends the Order Confirmation email to the customer, if the relevant setting for sending this email type is enabled (check your Store settings or your ESP plugin).
Frontend partner documentation for setting it up
To read more about:
- How to enable Cross-sell feature in Klarna checkout v3, follow this link
- How to implement Cross-sell through Klarna Checkout v3 in an e-commerce store, click here
How to select Cross-sell products
You might wonder how to decide which products from your product catalog should be shown as Cross-sell products, and when. This is something your front end is in charge of. They fetch the product catalog from Centra and you decide together the best way to filter out the Cross-sell products. They could, for example, use product relations with a specific 'Cross-sell' tag, a custom attribute for Cross-sell, or a specific folder/category. The options are unlimited in getting Cross-sell products out via both our Checkout and Shop API.
How the Cross-sell flow works
When the purchase is completed, the consumer is notified via suitable messaging that more items can be added to the existing order. The benefit of this feature is that you could increase the average order value by offering customers relevant additional items they can purchase.
This Cross-sell window is available to the customer for a limited amount of time. If Cross-sell products are added to the basket, the original authorization will be changed accordingly.
Most common order flow in checkout
- The customer places an order by adding items in the basket, proceeds to checkout and follows through with the payment step, where they choose Klarna checkout.
For the Cross-sell to work it is important that the customer selects a payment option within the checkout that works with Cross-sell. For example, they cannot use the credit card option, but can instead select 'Pay later'.
- As soon as they finalize the payment and reach the Order Confirmation page, a new section appears, such as ‘Don’t forget these’ or ‘Special offers’, showing the listed Cross-sell products
This section is to be implemented by your frontend partner.
- Customers can add Cross-sell products to the order post-purchase for a predefined amount of time (3 minutes by default, but can be changed in Plugin settings)
- The customer adds one of the products listed in the Cross-sell section to the order, similar to how customers add products to the basket pre-checkout
- An order confirmation email is sent after the Cross-sell time limit passes plus an additional minute. For example, if you set the Cross-sell time limit to 10 minutes, the order confirmation email will be sent after 11 minutes. Even though the order might be finalized after 2 minutes, the email will not be sent before 11 minutes have passed.
Which products can be added to an order
For Cross-sell products to work, the same rules apply as for other normal products to be buyable. So, for example, they need to have a display, be active in a market, have a price and so on. More details can be found here. The only exception is Flexible bundles, as they are not available for Cross-sell.
When a product already exists in the order and the same product is also added as a post-purchase Cross-sell product, the newly added Cross-sell product will appear as a separate order item line. Therefore, you will be able to distinguish between the original and the Cross-sell product.
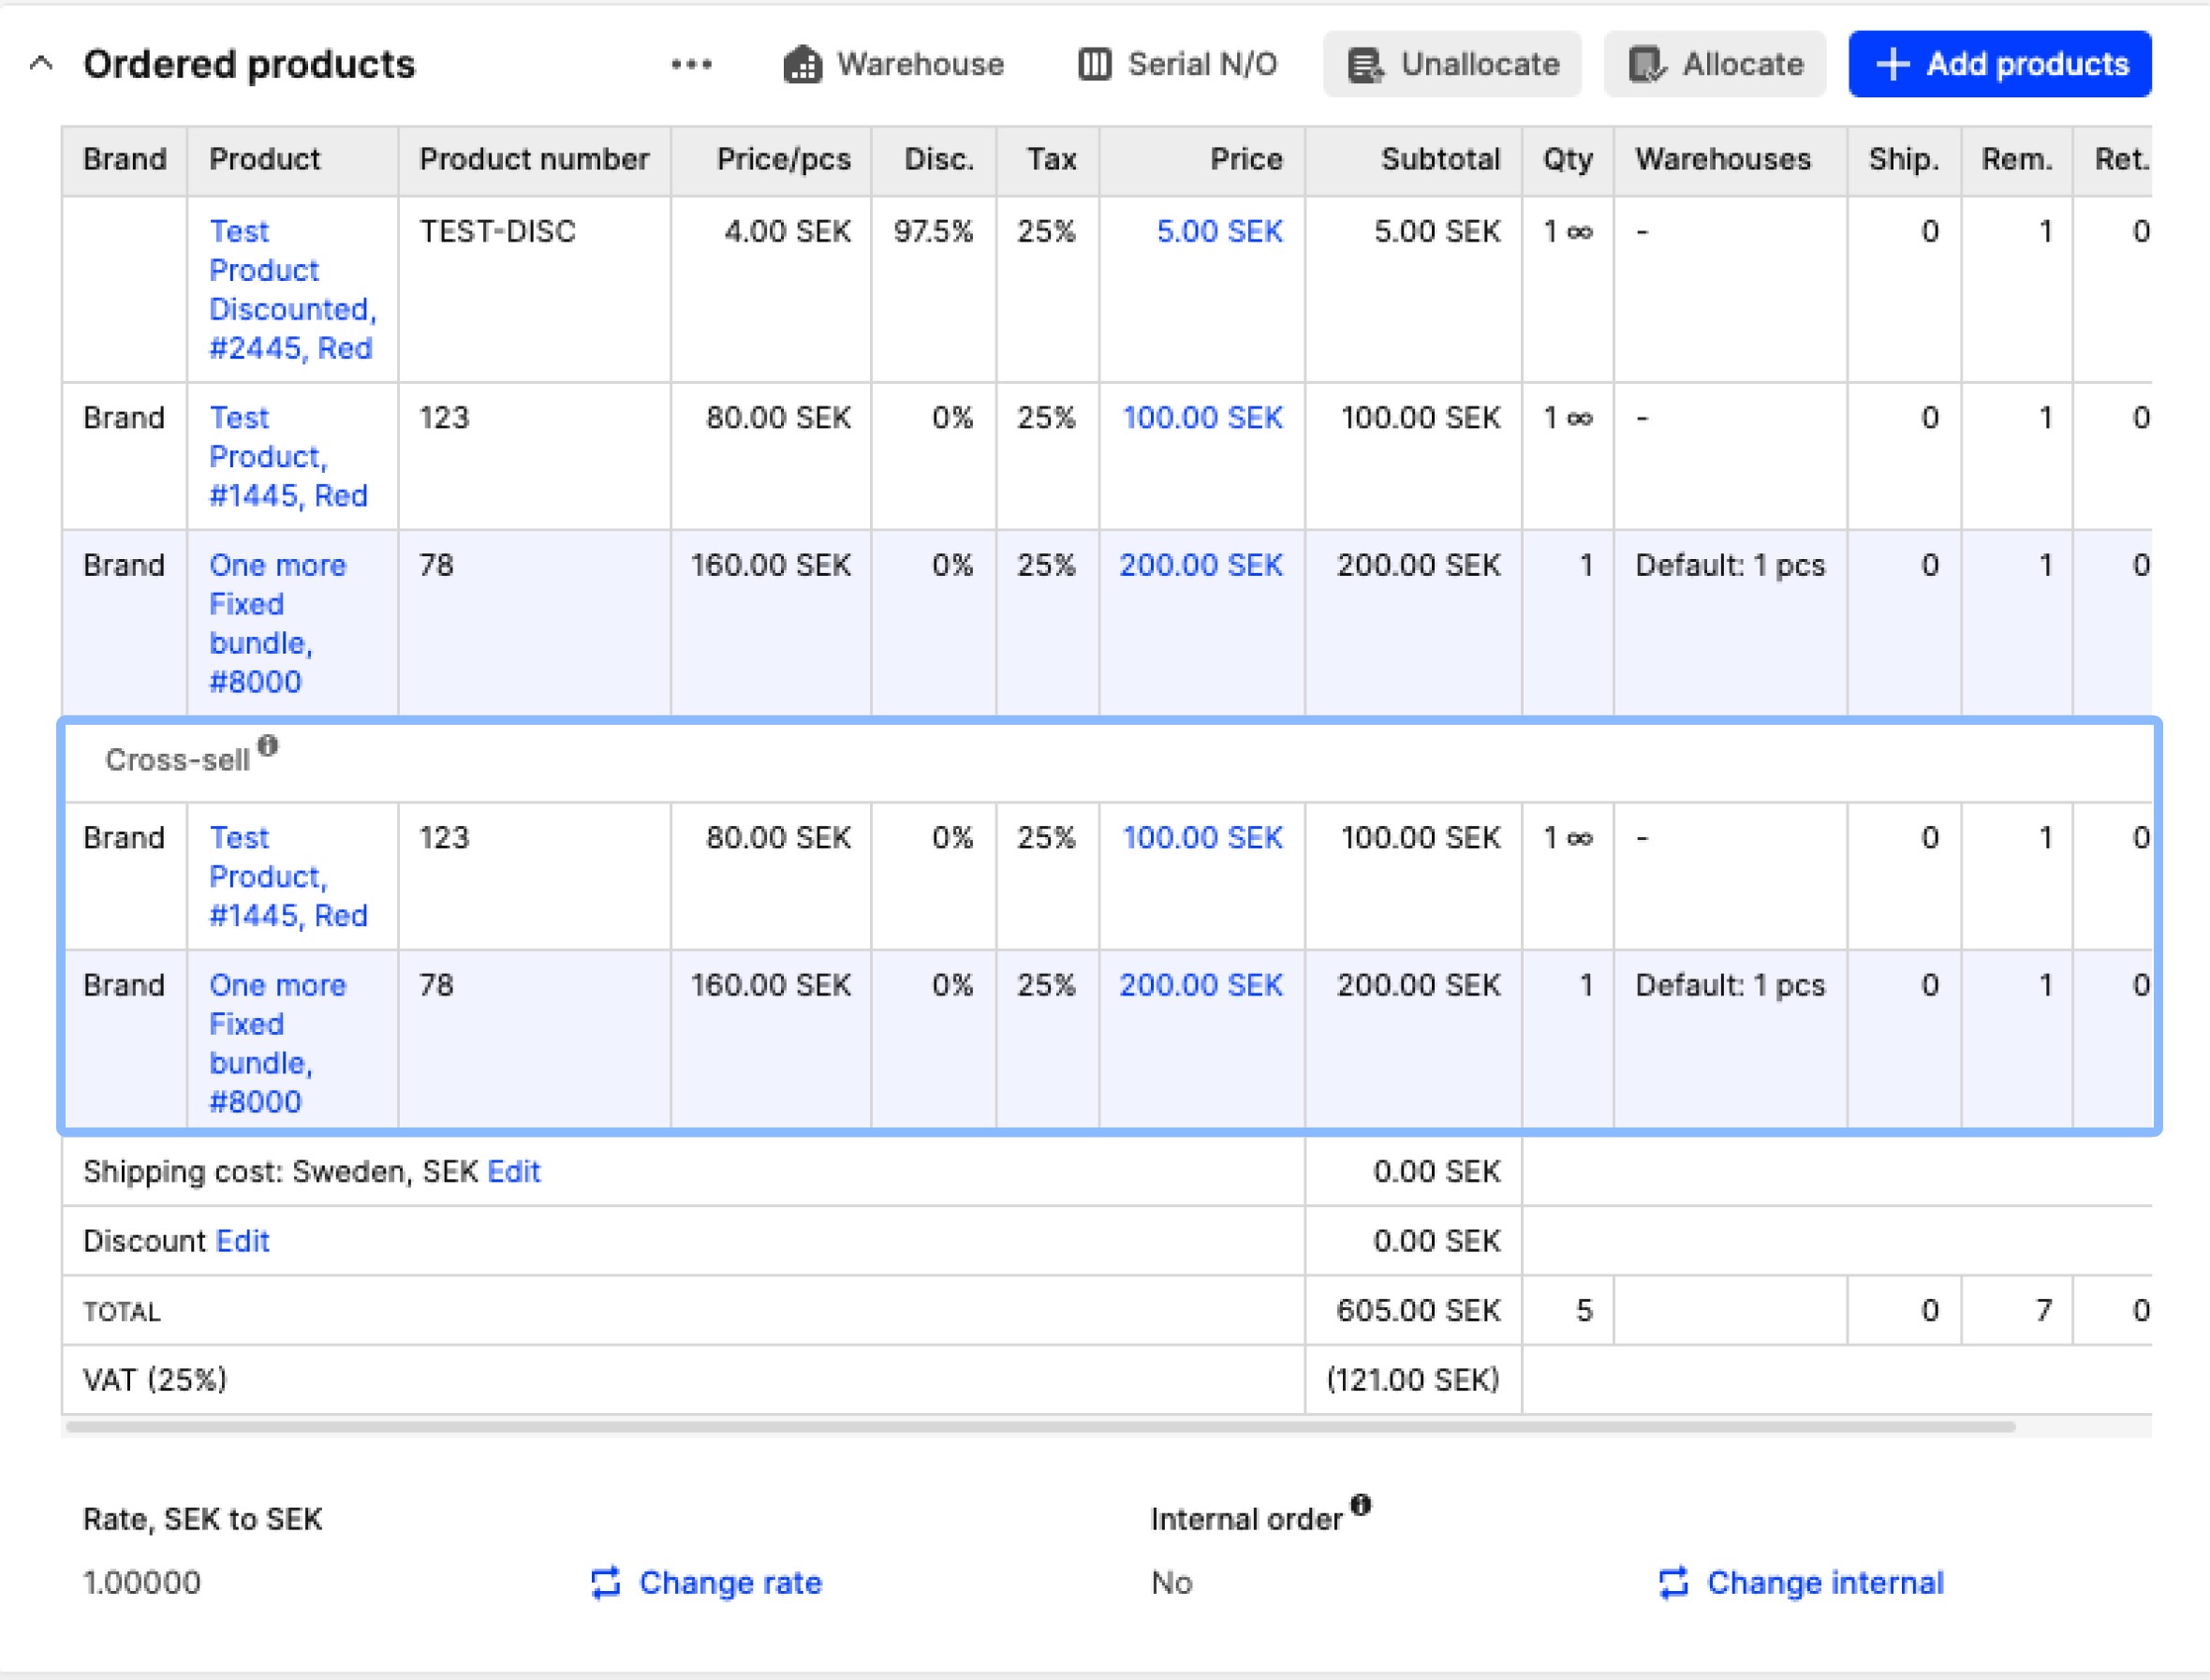
Example of an order with a Cross-sell product in Centra
The most important sections to pay attention to on an order containing Cross-sell products are: Ordered products, Payment information and Order history. Read more about each below:
Ordered products
Cross-sell products that were added to an order through this feature are displayed in the ‘Order products’ section as additional order item lines:

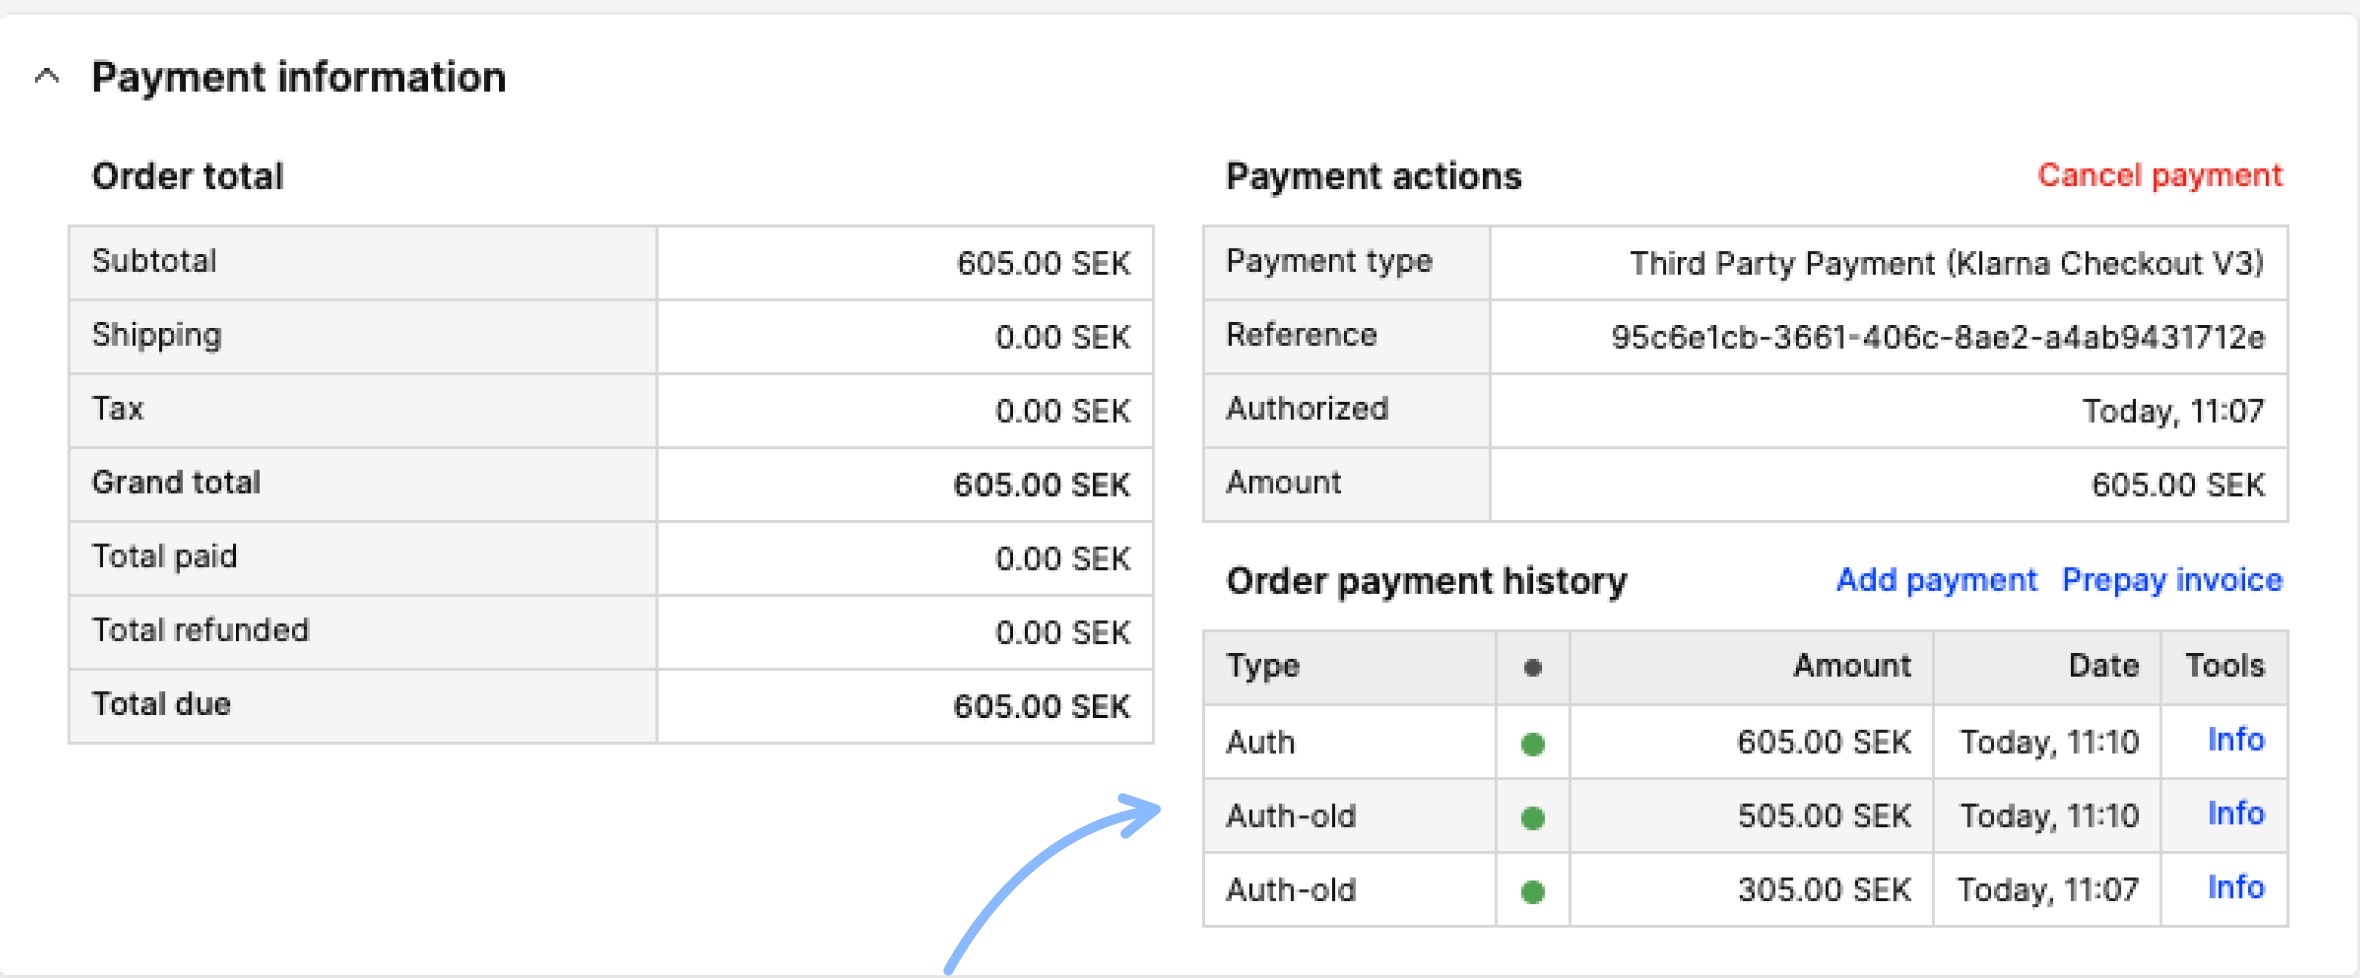
Payment information
Previous auth transactions are ‘deprecated’ and marked with the suffix ’-old’. Centra then creates a new auth transaction looking like this:
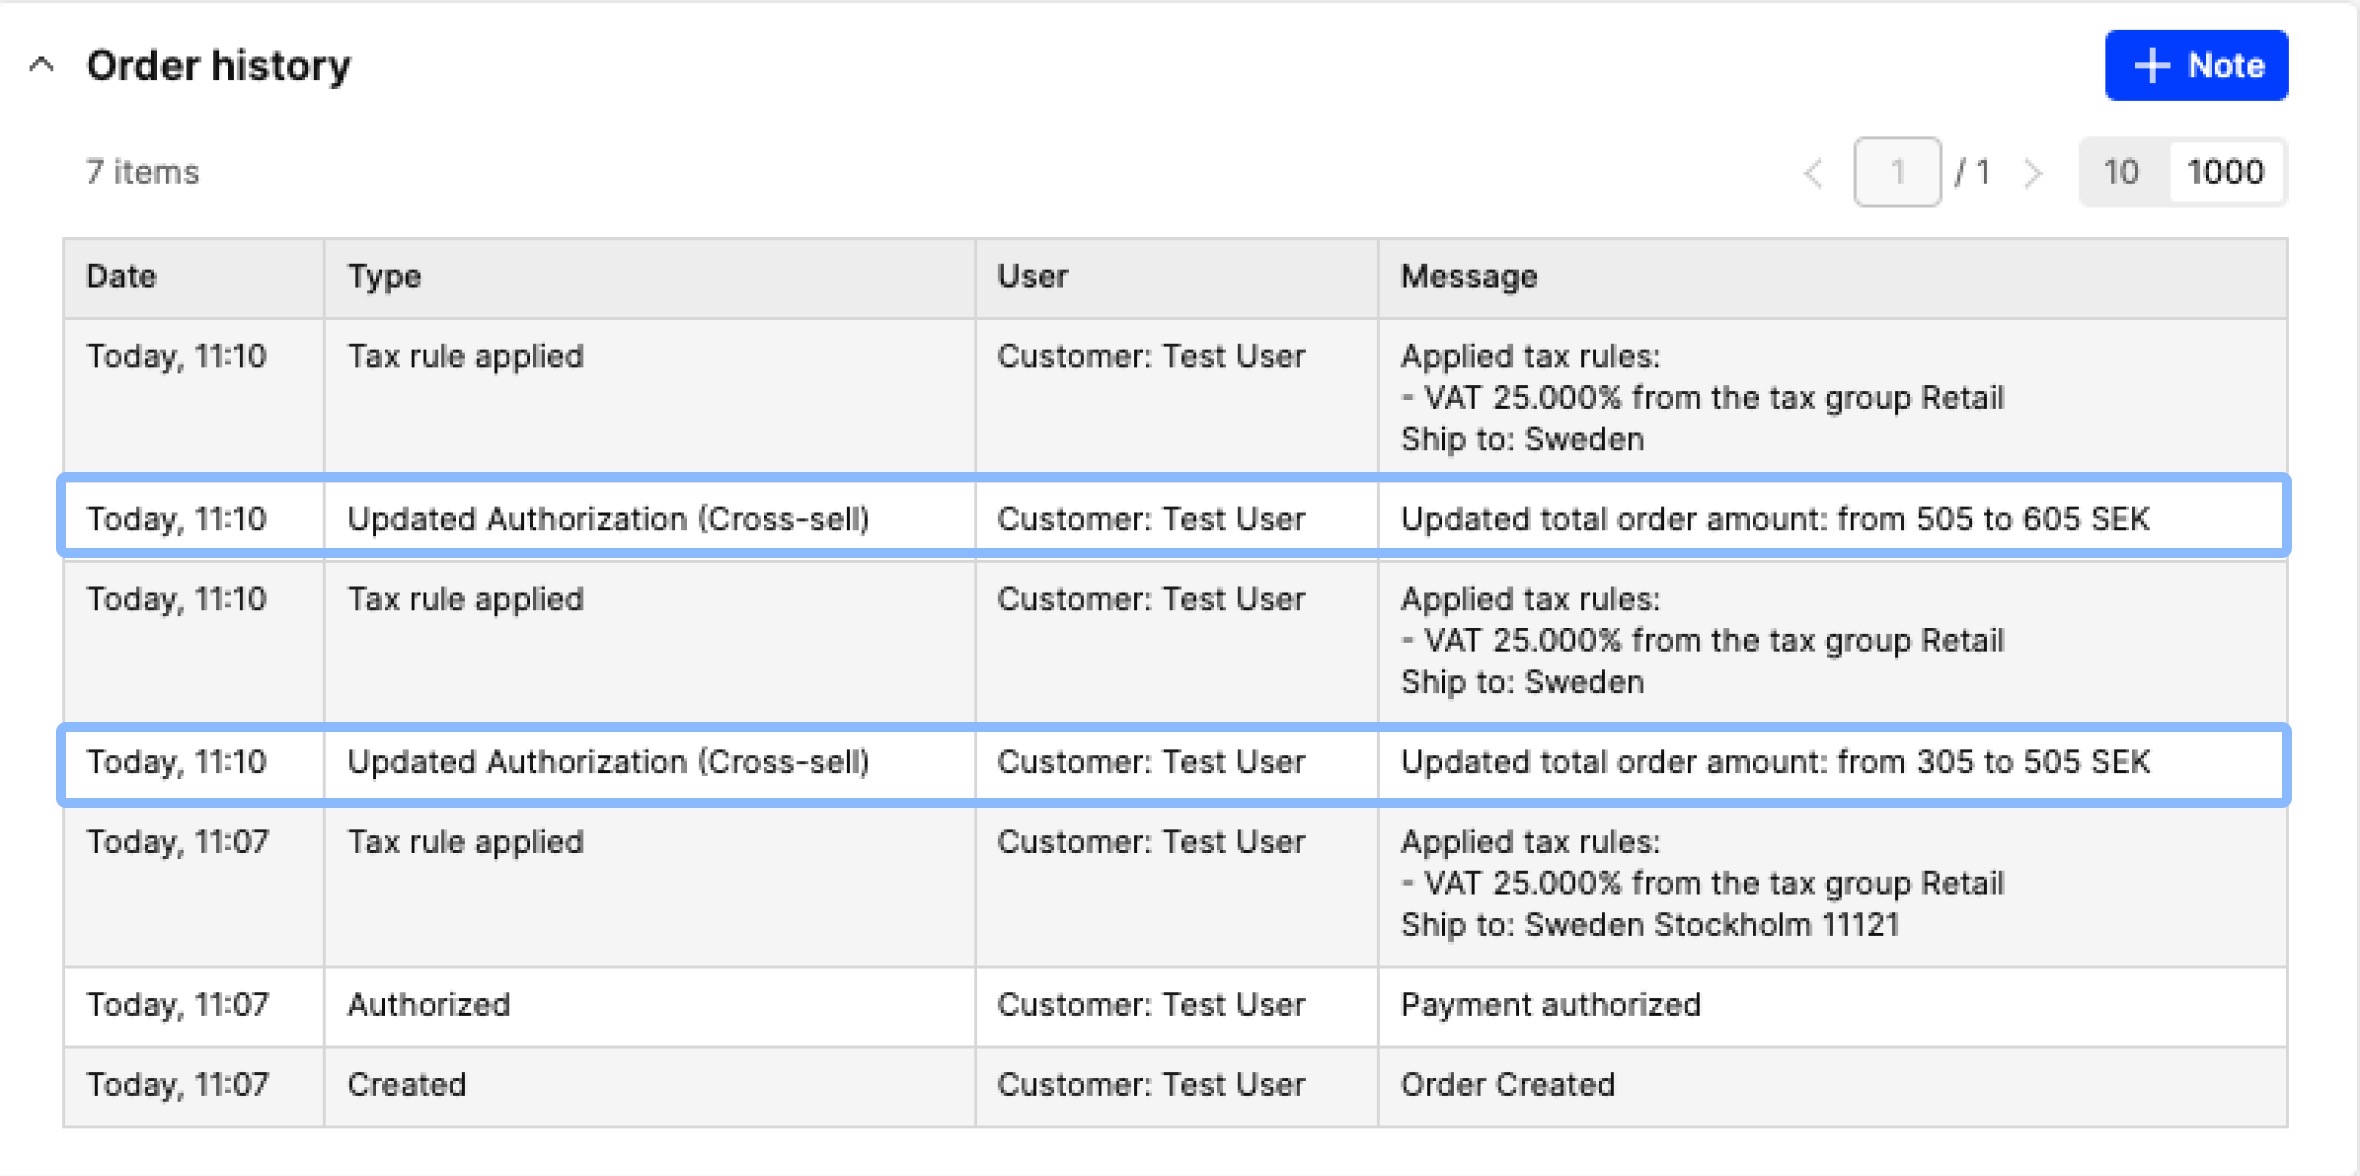
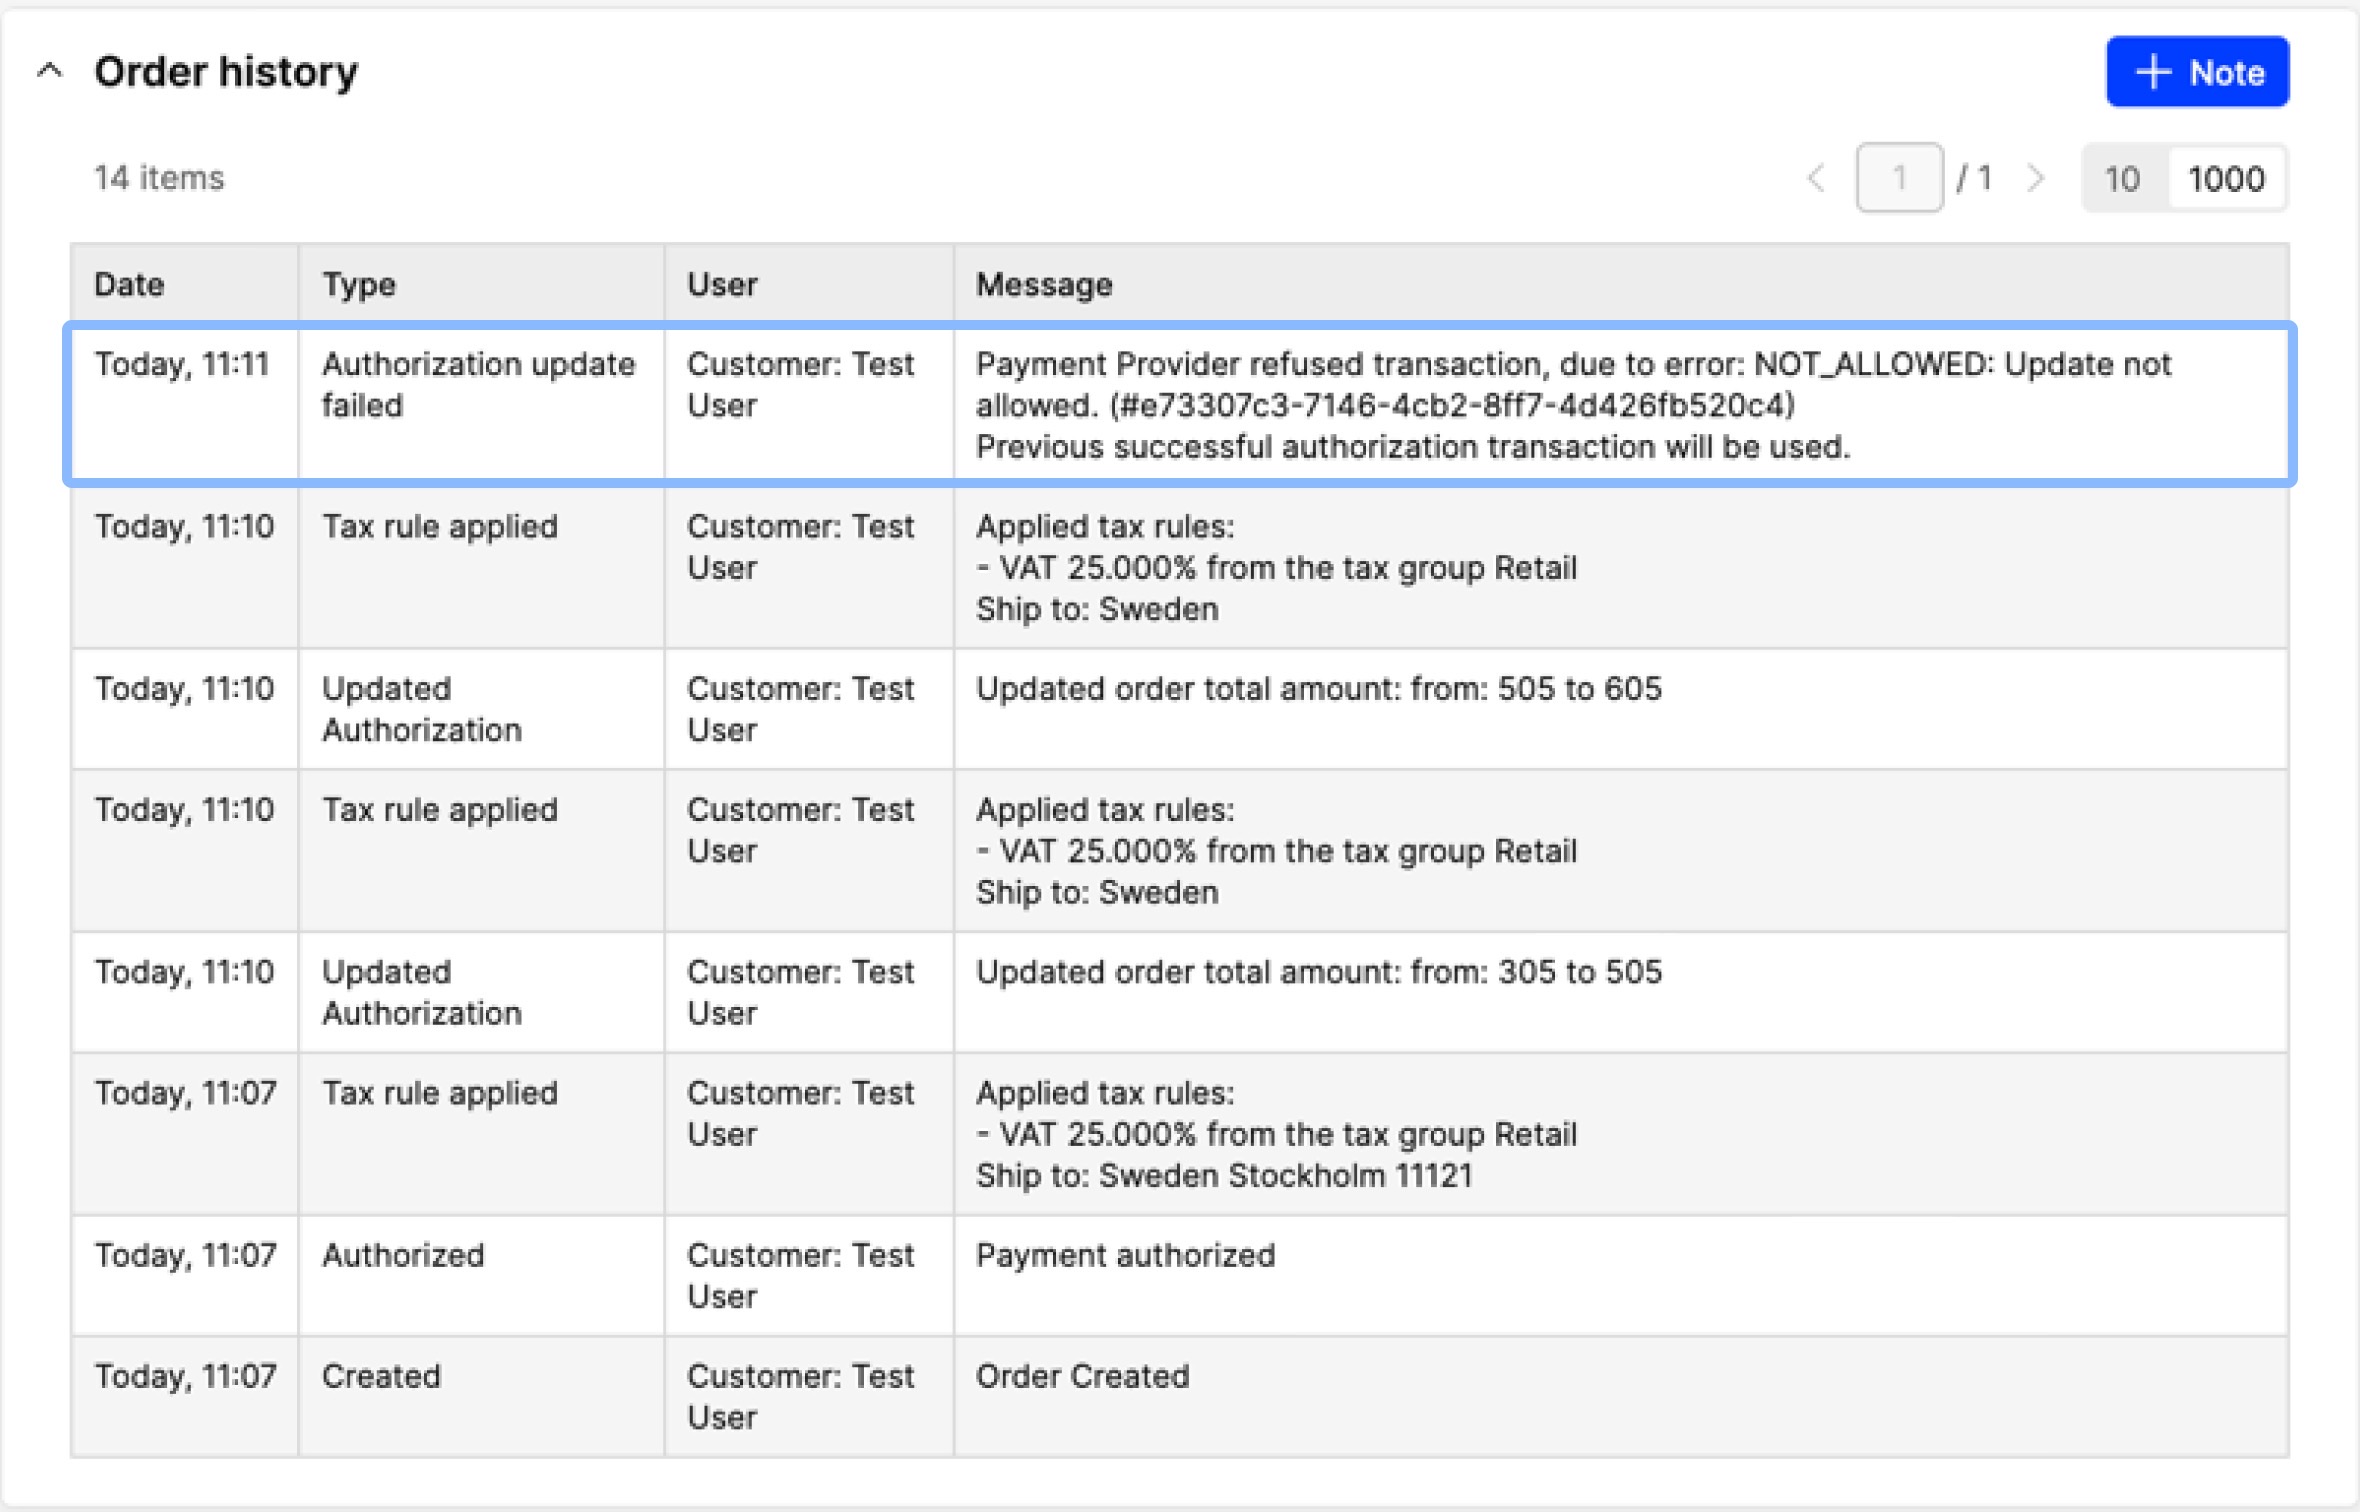
Order history
The Order history section contains data about the order total being changed with the cross-sold product value:
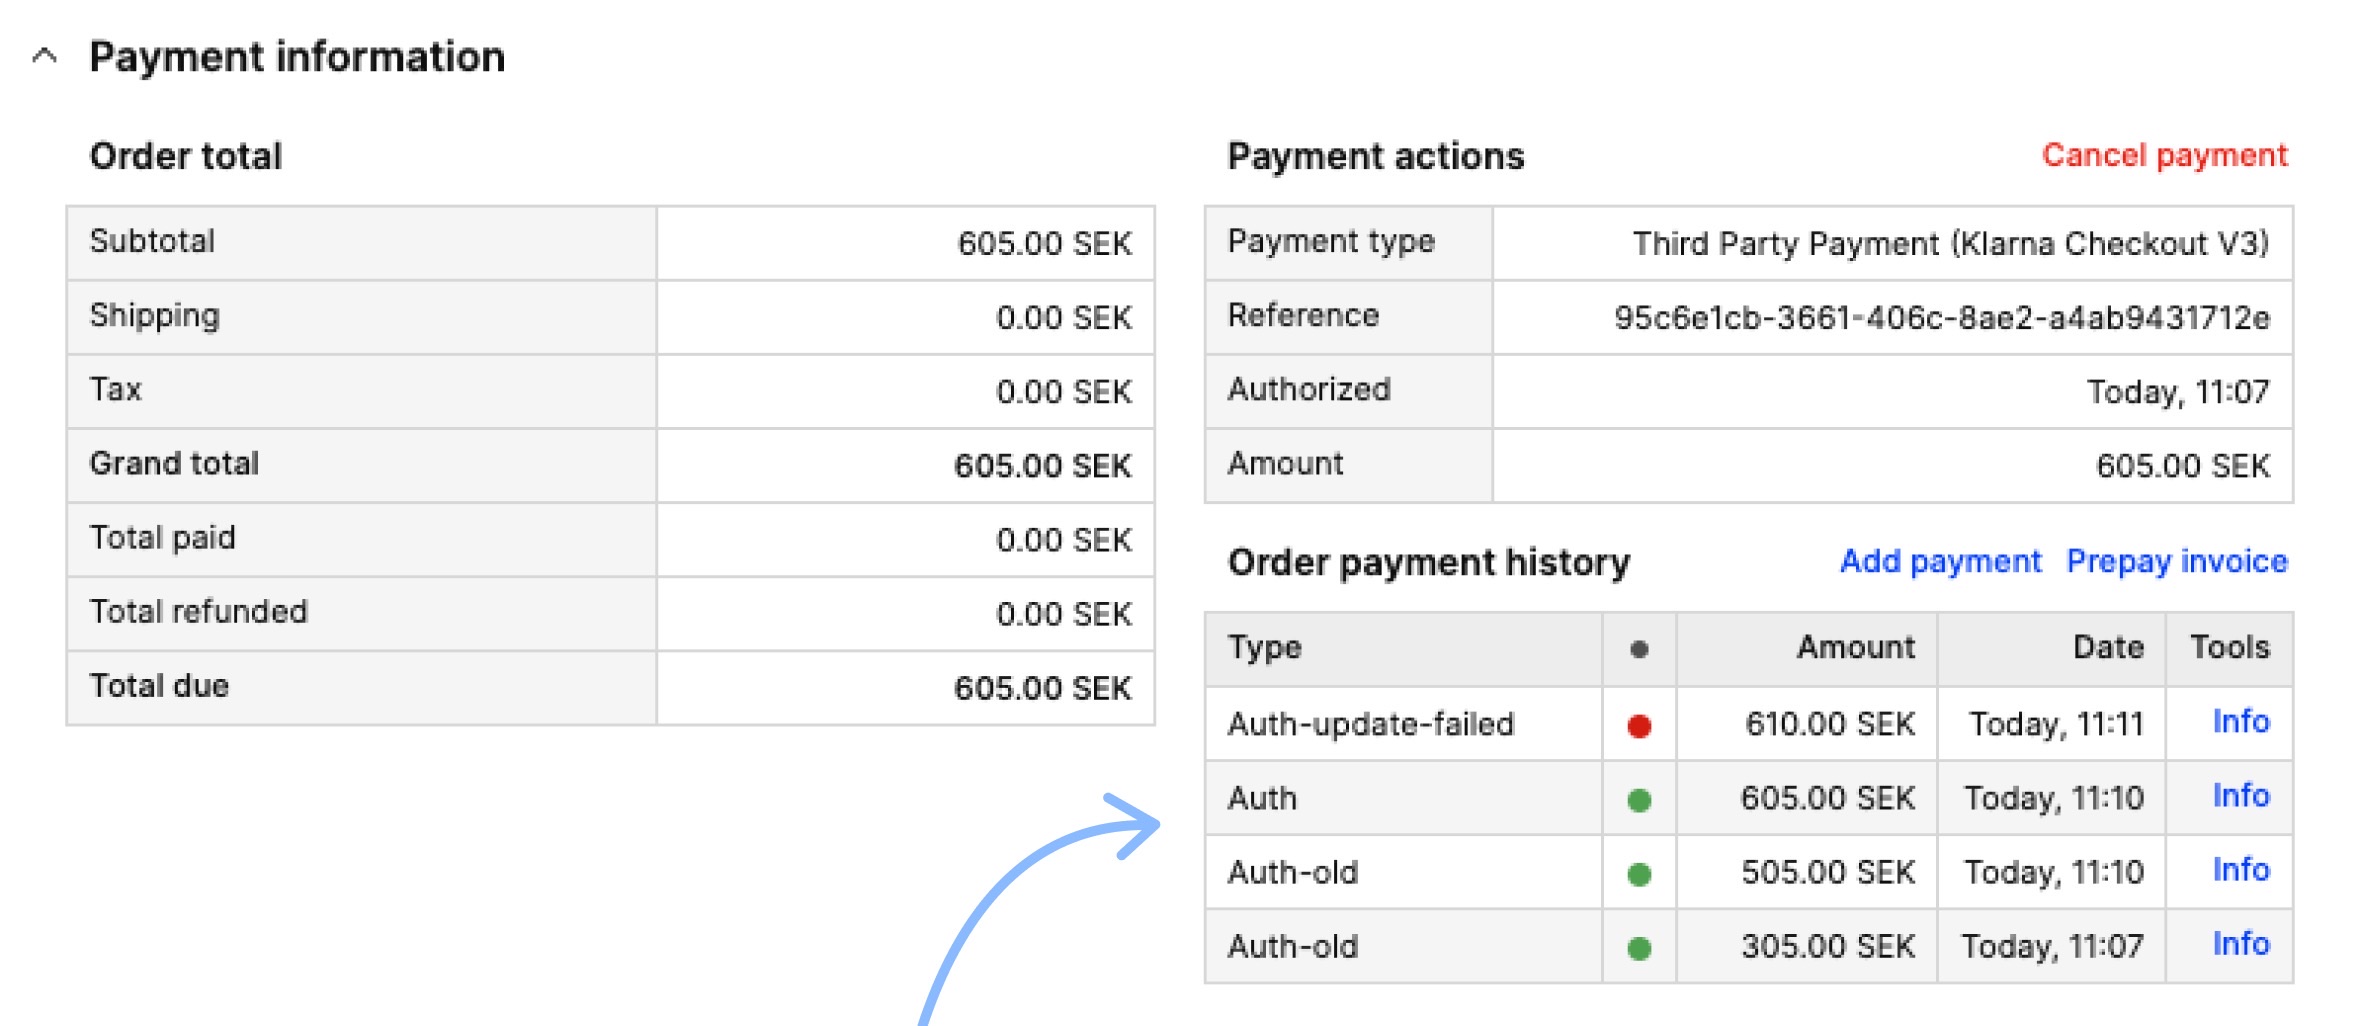
Example of order with a failed Cross-sell transaction
In cases where the Cross-sell transaction fails, Centra:
- Reverts the Order to its previous state before Cross-sell products were added
- Logs the failed transaction
- Logs data in the Order history section
- The Order Receipt email is sent after the Cross-sell time out limit is over. This means that only the original products are listed in the email without the Cross-sell products
The previous successful transaction remains active and can be captured as usual.
How Cross-sell interacts with other parts of Centra
- Any product can be offered as a Cross-sell product except for Flexible bundles
- Vouchers
- The discount is applied in the selection and remains connected to the products in the initial order when a Cross-sell product is added to the order later on. However, the discount is not applied to the Cross-sell products and is not updated in the order after adding Cross-sell products
- Campaigns
- The discount is applied in the selection and remains connected to the original order when a Cross-sell product is added to the order
- The discount is applied to the Cross-sell products just like to any other product. For example, product X belongs to an active campaign and it is added to the order as the Cross-sell product price will be dictated by the campaign
- Taxes
- They are applied to Cross-sell products based on the tax settings in Centra, the same way as for the initial order
- Shipping costs
- Shipping is calculated only at the time of order creation. So the shipping cost is not changed when a Cross-sell product is added
- Example: Let's say that the shipping configuration dictates that orders below 150 SEK have a shipping fee of 20 SEK, and above 150 SEK the shipping is free. If I buy an item for 100 SEK, the shipping cost is 20 SEK. I then add an item to the order via Cross-sell that increases the order total to more than 150 SEK. In this case, the shipping cost will not change, since only the original shipping cost stays on the order
- Visibility of Cross-sell order items in Centra
- In Centra, the order items added through Cross-sell are tagged to be able to distinguish it from other order items. So we are separating Cross-sell order items from the rest of the items.